Strange things happen when the light of a full moon shines on you. Photographing a Total Lunar Eclipse takes making a photograph of the moon to a whole new level. Wise people say that you should keep it simple (the KISS method). The following is some of what I learned from ignoring the wise people, while shooting the Total Lunar Eclipse on January 20-21, 2019.
Lesson: You can not plan things out enough.
Why? My plan was to have a completely simple manual setup for insurance against all the catastrophic failures that would occur to my second camera setup that was very automated, with an EQ mount tracker pointing the camera, and a laptop changing the settings on the camera for sophisticated bracketing and controlling the timing of the shots being fired to synchronize with the eclipse events. I also had planned for laptop or software/programming failures, having intervalometers ready to fire, and detailed notes on what to change the exposure setting to, and when. As you will see, I needed every contingency.
Lesson: Everyone knows that you should not use new gear or untried techniques on a shoot where you only get one chance to get the shot.
Why? Chaos is sure to ensue. In this case, I brought out a brand new EQ mount (tracker) with which I had never before done a polar alignment. In my defense, I did buy the mount months in advance. However, life just got in the way of testing it, in the form of a heavy travel schedule, and very uncooperative clouds. So an hour before the eclipse starts, I am out there trying to do my first polar alignment. That was the correct time to do the alignment, but it would have been better if I had the experience of having done it before. For professional shoots, this would be unacceptable, but for shoots for the love of photography, trying the unknown allows for more learning moments.
Lesson: Have a backup plan for having a good polar alignment (and for everything else, too).
Why? On the night of a full super moon, the moon light will be too bright to allow you to identify the constellations that will help you find Polaris (the north star), which is key to a good polar alignment.
Lesson: If your backup plan for a good polar alignment in winter time involves the use of a cell phone, think again.
Why? First, It will be freezing cold (in this case 22 deg. F with 14 mph winds). The fancy new photography gloves you bought has magnets stitched in the finger and thumb tips to hold the tips back when you need your fingers to manipulate your camera. (Note lesson above about new gear). If you hold your phone in your gloved hand, the magnets will make your compass app work like Jack Sparrow's compass, and night sky apps that would help you find Polaris will place it just about anywhere in the sky, then move it somewhere else, and then move it again. Of course, you could take your gloves off for a few seconds at a time.
Second, If you have an older model iPhone, in 22 degrees F, a fully charged battery will last about one minute, and then the phone will shut down. If you planned to use it for polar alignment, if you had all your notes and times for each eclipse phase documented on your phone, or if you had an alarm set to prepare you for each key moment, then all that is just toast! Gone in 60 seconds takes on a whole new meaning.
Lesson: If you plan to use a laptop to drive your camera through complex exposure changes to match the exact timing of each phase of the eclipse (using code you just spent days creating), and it is 22 degrees F, note what happened to your phone, and be sure you have external power readily available for the laptop.
Why? In my case, the laptop battery lasted around 5 minutes, and died less than 2 minutes before totality (just before the photograph at the top of this page). All the days of programming was toast! Fortunately, I did have two fully charged intervalometers ready to go. Also, fortunately, since I had spent so much time doing the programming, I still remembered the exposure setups I had hoped to use for the key moments, and I was able to quickly set up the camera to shoot it manually.
Lesson: It is better to be lucky than good. It is even better to be both.
Why? I managed to get the previously computer driven camera converted to manual exposure just before the photo above was taken. I knew that I wanted that shot, just on the brink of totality, I took the shot, and I got it! My mind then drifted to what Neil Armstrong must have felt, trying to land the lunar module manually with no fuel left, after the computer tried to land it on a huge bolder. (Don't trust computers). :-) Make your own luck. Enough said.
Lesson: If you are not going to do a particular type of photography again soon, it is best to write down your lessons learned, and re-read them just before the next similar event.
Why? As an example, when I shot the Great American Solar Eclipse in 2017, I learned that if you were making manual adjustments to the aim of your camera (no tracker), then the use of a video head on your tripod made it infinitely easier to adjust than a ball head. However, if the elevation of the sun or moon is very high, it is possible that the head will not tilt back far enough to point to the correct location. In 2017 I had the same problem, and solved it by turning the camera around, as the head would tilt down more than it could tilt up. Putting the camera on facing backwards, allowed it to tilt to the correct location. I did not make a note of it in 2017, and ended up making the same mistake in 2019 with my non-automated camera setup. But this time I recognized the problem, and remembered the solution immediately, allowing me to very quickly recover. I think I only lost one frame from my time-lapse, so no big deal.
Lesson: Have a place for all your gear, and have everything in its place.
Why? When totality was achieved, it became very dark very quickly. That is not the time to go looking for your flashlight! (Mine was in my pocket, so I would not lose it.) The darkness was a large change from when the super moon had made it seem like daytime.
Lesson: Tape the red filter onto your flashlight.
Why? This is so that you do not go blind looking for the filter with the unfiltered flashlight when the filter falls off. The red filter works wonders for preserving your night vision.
Lesson: Learn how to turn off the interior lights of your car.
Why? Each time you open a door of the car, the interior lights will normally come on, totally ruining your night vision. To have continued access to the contents of your vehicle, you will be forced to leave your door and tailgate open until the light finally goes out. This is less than ideal when it is 22 degrees F, and windy. It leaves you no place to go to warm up, forcing you to put those magnetic gloves back on.
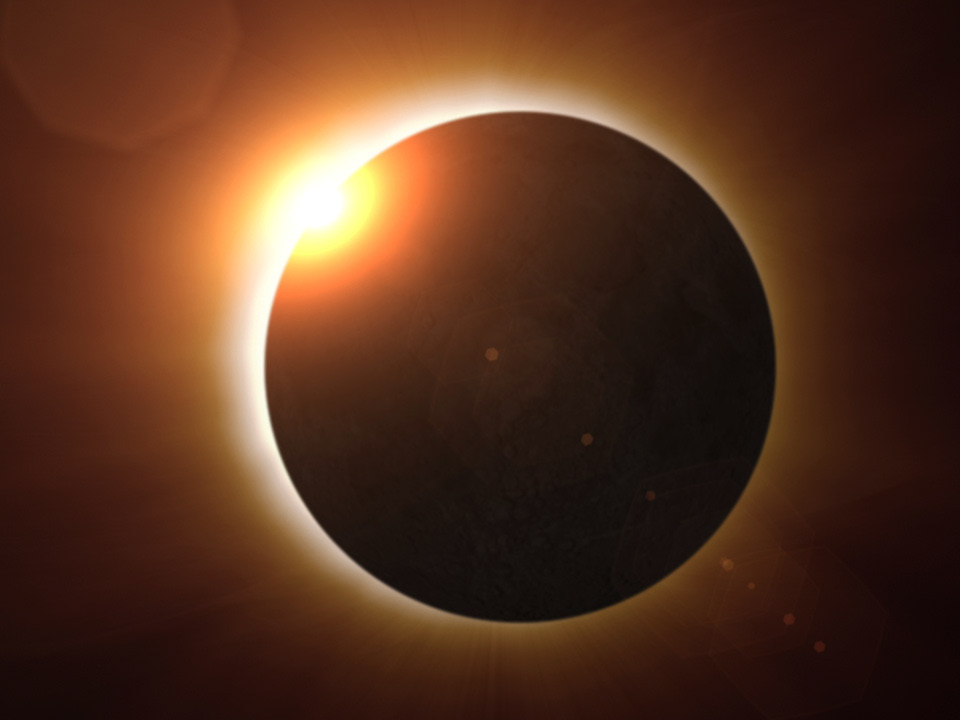
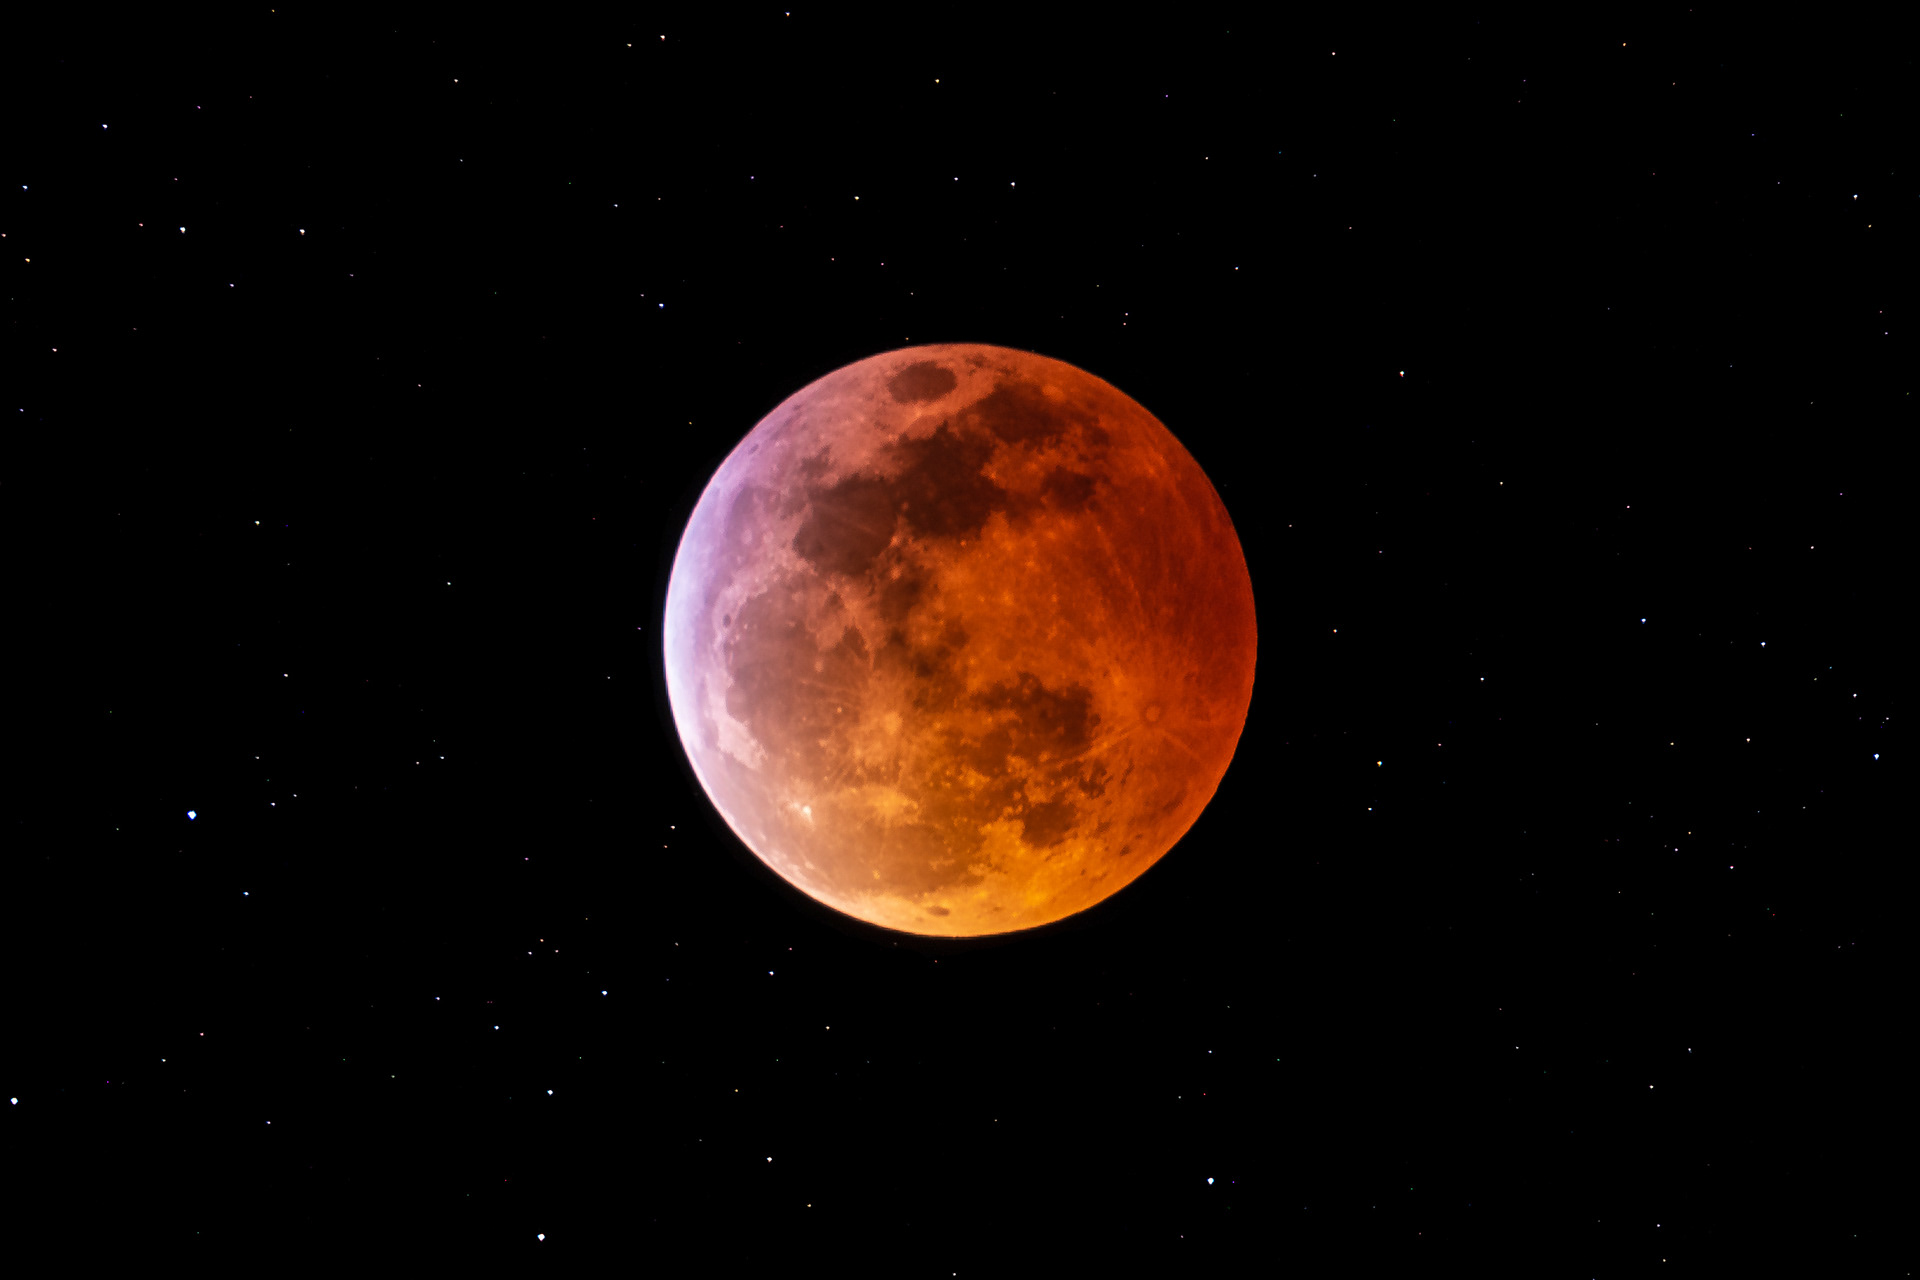
Just a note about the above photograph. It is a single image, no HDR, no compositing, no Photoshop. All the editing/cropping etc. was done with Lightroom. It was shot on a Canon 5D Mk IV, using a Canon 100-400mm L II zoom lens with a 1.4x extender (560mm total). Image stabilization was turned off, and focus was set to manual. The camera settings were f8, ISO 100, 20 seconds exposure. The camera was mounted on an iOptron Sky Guider Pro EQ mount. The mount was configured to track the moon precisely. The use of the tracker allowed the capture of the star field behind the moon, which sets tracker photos apart from non-tracked photos. The 20 second exposure time was chosen to hold in check star trails that occur due to the moon and stars moving at different rates and directions. This shutter speed did allow settings of ISO100 and f8, which are the sweet spots of the camera and lens, allowing for photos with little noise, even when cropped and printed large. I decided to process this particular image in the series because it caught the fleeting moment when the moon was just about to leave the umbra shadow of Earth, ending totality. During totality, the light that reaches the moon travels through the inner layers of Earth’s atmosphere, which passes along the longer-wavelength orange and red light. This is why the moon turns orange during totality. In the moments just prior to reaching the end of totality, some light reaches the moon after having passed through Earth’s ozone layer, which passes along blue, shorter-wavelength light. This results in a small strip of purple trim on the leading edge of the moon. It is a unique and splendid moment that occurs for only a brief moment in time.
All in all, I had a great time preparing for, and shooting the Total Lunar Eclipse. I learned a lot by reading through other peoples programming, to see what they were trying to achieve. I learned that there was not a cookbook instruction set available for shooting lunar eclipses, as they are much harder to predict (for exposure) due to so many atmospheric variables. Each is unique, and I found it to be a humbling experience to stand there and watch it unfold, as it has happened for so many previous years, and yet totally new. It was very different from the solar eclipse in 2017, but the feeling of awe was very similar. This lunar eclipse allowed more time to experience the wonder, but I somehow managed to jam almost every moment with photographic activity. Perhaps the biggest lesson learned was to take a minute, and step away from the camera. Soak in the experience. The photograph above has become special for me, not because it is a good shot, but because of the the memories surrounding the making of the image, and the special nature of this unique event. It is so nice to be able to share it with others.
Clear Skies! Legendary Photographs!